These Melted Snowman Cookies are homemade cookies that get covered in a 3-ingredient royal icing, and garnishes to dress them up as snowmen! Prep these fun cookies in just 30 minutes!
For more fun and delicious Winter treats try these Snowball Cookies that are rolled in powdered sugar or follow this How to Make Snow Cream recipe that uses actual snow to whip up sweet homemade ice cream!

Melted Snowman Cookies are one of winter’s most adorable treats that kids will go crazy for! Your heart will swell when you see how excited your kids and their friends get when you present them with these delicious, fun cookies!
Go a step further and win even more major brownie points by letting them help decorate them! After you bake the cookies, frost them, and pop the marshmallow head on, just slide the candy garnishes their way and see what kind of fun snowmen they come up with!
Whether you let little hands help you make these or not they’re great for so many occasions! Classroom parties, holiday gatherings, or even just something fun to do on a snowy day at home!

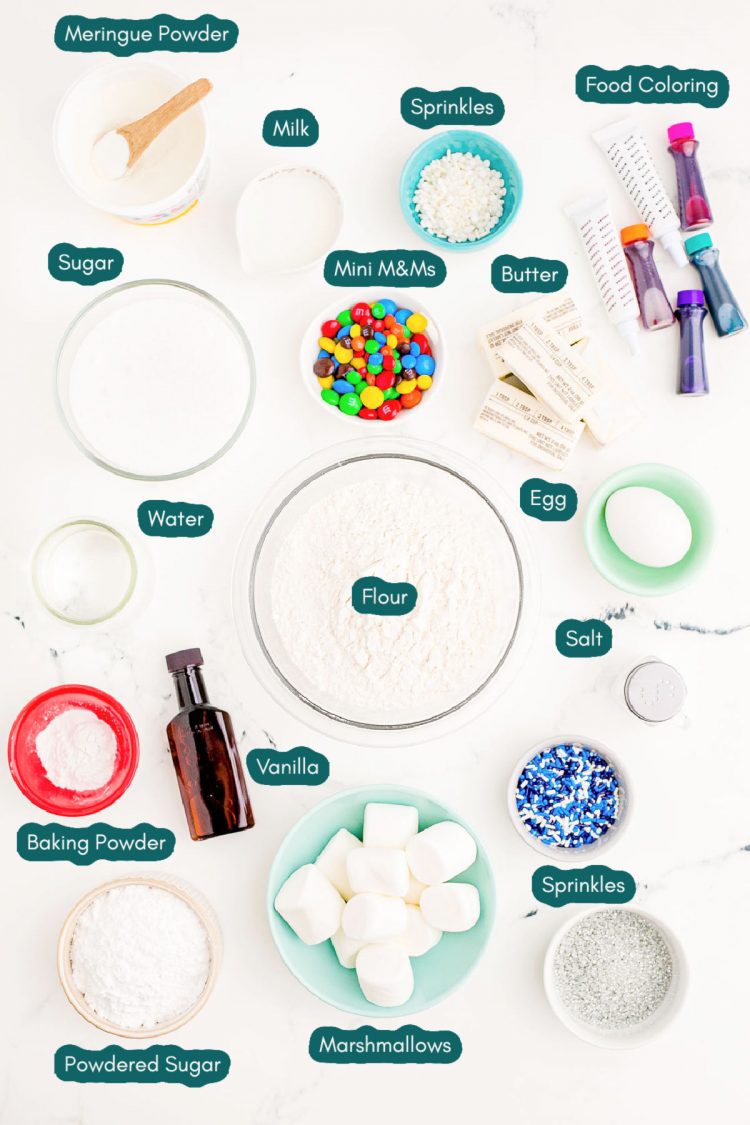
Melted Snowman Cookies Ingredients
This Melted Snowman Cookies Recipe is actually quite easy to make even though it results in extravagant-looking cookies that give the impression you spent a ton of time on them! To make them you’ll start with the cookies that are made using pantry staple ingredients you likely already have on hand.
You’ll need salted butter, granulated sugar, a large egg, whole milk, vanilla extract, all-purpose flour, baking powder, and salt. Once the dough is made it will need some time to chill in the refrigerator before rolling it out and cutting the cookies!
After the cookies have been baked and are completely cool it’s time to cover them in the royal icing which acts as the ‘melted snow’! To make this, powdered sugar, meringue powder, and warm water are beaten together.
The last round of ingredients is probably the most fun, the garnishes that are needed to assemble the snowmen! For this you’ll want to grab:
- Marshmallows – These are used as the head of the snowman.
- Gel Food Coloring – Orange and black. The dye will be used to color some of the frosting to make the eyes and arms as well as the carrot noses.
- Sprinkles – For a fun finish once the cookie are completed.
- M&M Minis – Used as the buttons on the melting snowmen.
- Pull and Peel Twizzlers – For the scarf around the heads of the snowmen!
How To Make Snowman Cookies
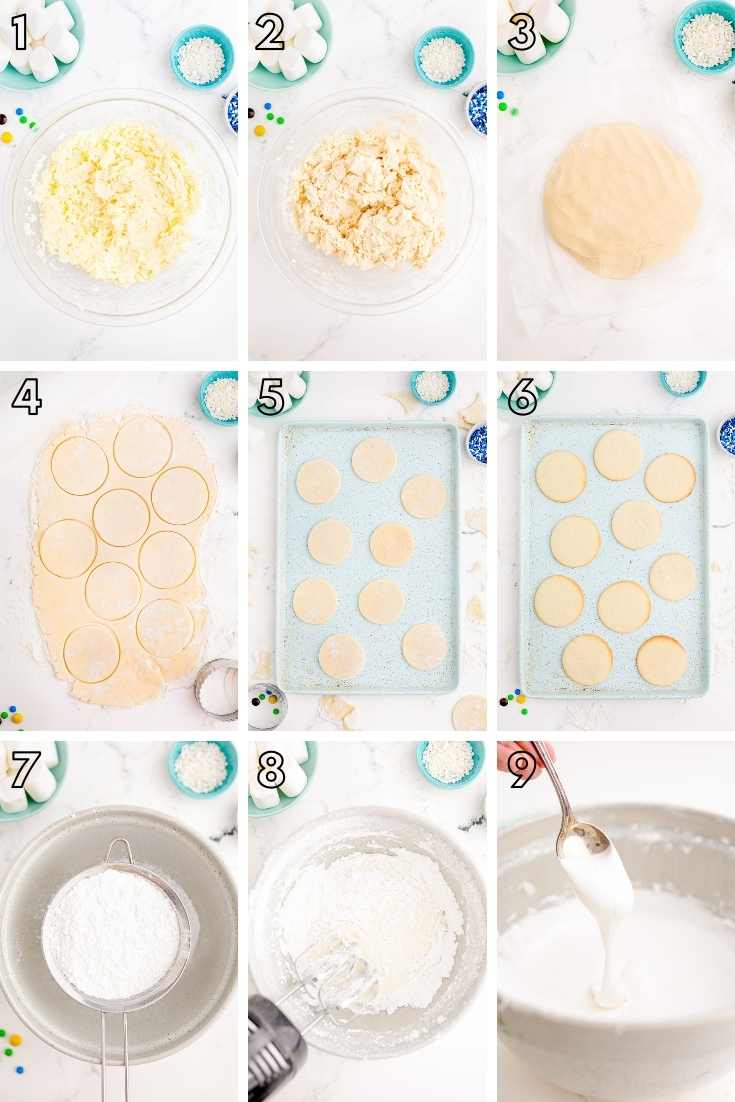
- Beat the butter, sugar, egg, milk, and vanilla together in a bowl. Next, add in the flour, baking powder, and salt, beating again until the mixture is well blended.
- Divide the dough into 2 equal-sized disks, wrap them in plastic wrap, and place them in the refrigerator to chill.
- Remove the cookie dough disks and allow them to sit at room temperature until they are soft enough to easily roll out.
- Roll the dough out onto a lightly floured surface and use a round cookie cutter to cut out the cookies.
- Place cookies on an ungreased baking sheet and bake until the edges are just golden brown.
- Remove the cookies from the oven and place them on wire racks to allow them to cool completely before frosting them.
- Prepare the icing by sifting together the powdered sugar and meringue powder. Then add in the warm water and beat the mixture until it becomes thick yet loose enough to slide around on the cookie a bit.
Assembling Melted Snowman Cookies
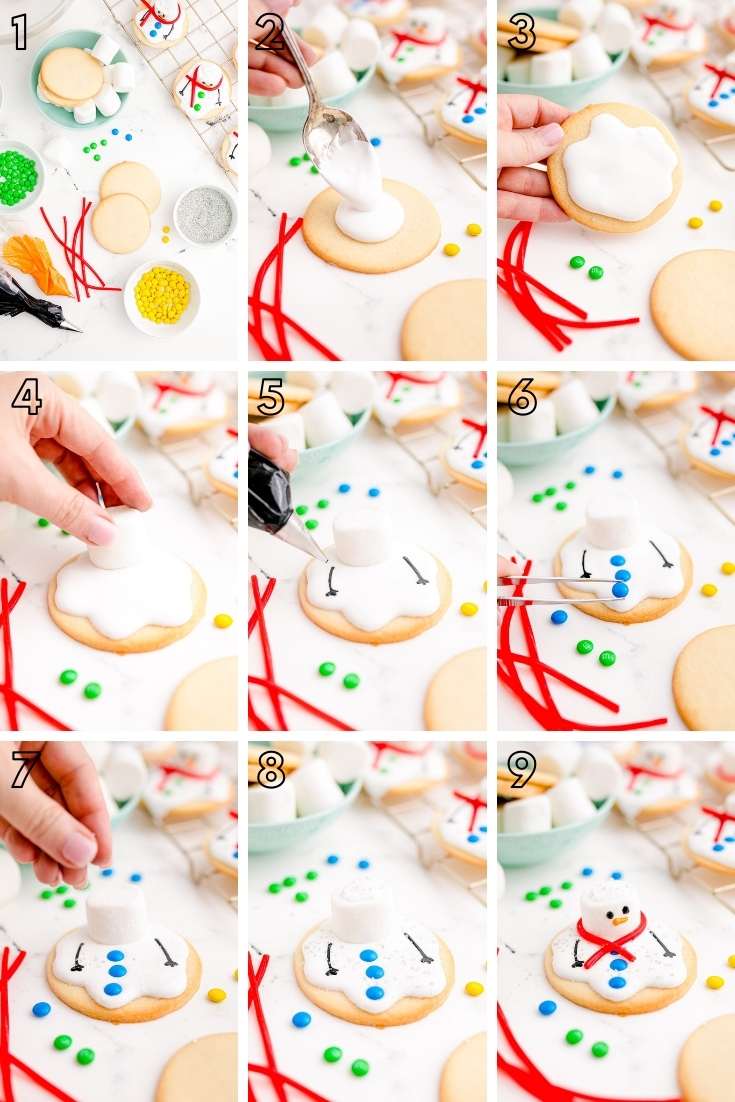
Now it’s time to assemble your adorable cookies. The steps are rather simple, they just require a little attention to detail. You may also find a pair of food tweezers helpful!
- Drop a dollop of icing onto the middle of the cookie, spreading it over towards the edge.
- Place a marshmallow on each cookie for the head of the snowman.
- Add black gel food coloring to some of the icing to pipe on arms and eyes. Do the same with the orange food coloring to make the carrot nose.
- Drop on some mini M&Ms for buttons, wrap the licorice around the marshmallow for the scarf, and some sprinkles for fun!
Melted Snowman Cookies FAQs
How To Store
Finished cookies can be stored for up to a week at room temperature when stored in an airtight container. You can also freeze them for up to 3 months.
Can I Save The Leftover Icing?
Absolutely! You can store unused icing in the fridge for up to 2 weeks or even in the freezer for up to 2 months.
How Can I Add A Bit More Flavoring To The Royal Icing?
You can add in some vanilla extract, almond extract, or even peppermint extract a teaspoon at a time. Just keep in mind if you don’t grab a clear vanilla extract it will tint the coloring of the frosting.
Can I Add Food Coloring To The Icing?
Yes, you can, but I’d recommend using gel food coloring to get a more intense color without using as much.

As much as adults love desserts kids love them even more, especially when it comes to these super cute cookies! Grab another dessert recipe that your kid’s eyes will also light up with excitement for!
- Chocolate Hershey Kiss Cookies – Chewy homemade chocolate cookies that are rolled in your choice of sprinkles and topped with a Hershey’s kiss!
- Movie Night Marshmallow Treats – The kids will love these buttery marshmallow treats that are packed full of popcorn, peanuts, and chocolate!
- M&M’s Cookie Cake – A giant cookie with M&M’s topped with chocolate frosting for a colorful fun treat the whole family will look forward to!
- Chocolate Peanut Butter Cupcakes – Bite into one of these cupcakes that are made with a boxed cake mix and you’ll be greeted with a surprise filling of Reese’s Pieces!
- Circus Animal Sugar Cookies – Refrigerated cookie dough with circus animal cookies, white chocolate chips, and rainbow nonpareils for an easy-to-make recipe!
Let’s Connect!
If you’ve tried this recipe, please let me know how you liked it in the comments below and leave a review. I love hearing from you!
Don’t forget to tag me – @sugarandsoulco – on Instagram and Pinterest with your photos or join our Sugar & Soul Show-offs Community and share them there, where you can join our recipe challenges!


Melted Snowman Cookies
Equipment
- Electric hand mixer or stand mixer
- Large bowl
- Spatula
- Small spoon
- Rolling Pin
Ingredients
Cookies
- ½ cup salted butter
- 1 cup granulated sugar
- 1 large egg
- 2 to 3 Tablespoons whole milk
- 1½ teaspoons vanilla extract
- 2-2½ cups flour see step 2
- 2 teaspoon baking powder
- ¼ teaspoon salt
Royal Icing
- 4 cups powdered sugar
- 3 Tablespoons meringue powder
- 7 Tablespoons warm water to start
Garnish
- 30 marshmallows 1 for each cookie
- Gel coloring
- Sprinkles
- M&M minis
- Pull and Peel twizzlers
Instructions
Cookies
- In a medium bowl, beat together the butter, sugar, egg, milk, and vanilla. Then add the flour (start with 2 cups), baking powder, and salt. Beat this until well blended. If the dough is still really sticky you may mix in another ¼ to ½ cup of flour.
- Divide the cookie dough into 2 equal-sized disks. Wrap these and chill them in the refrigerator for 1 hour. When you remove the dough from the fridge, allow it to sit at room temperature until soft enough to roll easily.
- Preheat the oven to 375°F.
- On a lightly floured surface, roll out the dough to ¼ inch thick.
- Use a 2½-inch, lightly floured round cookie cutter to cut out as many cookies as you are able to.
- Place the cookies 1-inch apart on ungreased baking sheets.
- Bake for 7 to 10 minutes or until the edges are just golden. They can cook quickly so watch carefully after the 5-minute mark.
- Transfer the cookies to cooling racks to cool completely before frosting them.
Icing
- In a large mixing bowl, sift together the powdered sugar and meringue powder. Add 5 tablespoons of warm water. Use a stand mixer with a whisk attachment (or an electric hand-held mixer) to beat at high power for 10 minutes.1
- When you are ready to ice/make the melted snow, drop a dollop of icing onto the middle of the cookie and carefully spread it out towards the edges. You can make this as perfect or messy as you’d like – after all – it’s a MELTED snowman cookie.2
- Place one marshmallow on each cookie to represent the head of the snowman.
- When you are ready to add the eyes and buttons, add some black gel coloring to some of the icing and pipe on arms and eyes. Do the same with orange food coloring to make icing for the carrot nose. Then drop on some mini m&ms for buttons, licorice for the scarf, and some sprinkles for fun!
- The royal icing will take about 2 hours to dry at room temperature. If you need the icing to firm up more quickly, you can refrigerate them.
Video
Notes
- Check the consistency of the icing. You want to get a thick consistency of icing that still has the ability to move and slide on the cookie a bit. Add more water if the icing is too thick and is so still that it will barely move. If it is too thin, beat longer, it thickens the longer you beat it.
- Some icing might slowly run off the side, that’s ok. But if it quickly runs off, your icing may be too thin. Either way, just use a little trial and error to get the look you want. There will be plenty to experiment with!
- How To Store: Finished cookies can be stored for up to a week at room temperature when stored in an airtight container. You can also freeze them for up to 3 months.
- Can I Save The Leftover Icing? Absolutely! You can store unused icing in the fridge for up to 2 weeks or even in the freezer for up to 2 months.
- How Can I Add A Bit More Flavoring To The Royal Icing? You can add in some vanilla extract, almond extract, or even peppermint extract a teaspoon at a time. Just keep in mind if you don’t grab a clear vanilla extract it will tint the coloring of the frosting.
- Can I Add Food Coloring To The Icing? Yes, you can, but I’d recommend using gel food coloring to get a more intense color without using as much.
Nutrition
Did You Make This Recipe?
Don’t forget to share it with me on Instagram @sugarandsoulco and follow on Tiktok @sugarandsoulco and Pinterest @sugarandsoulco for more!



Share your thoughts!
Love this recipe? Share your thoughts with me below and leave a review! And don’t forget to connect on your favorite social platform below!